前言
去年考完研,打算学一学Python要如何调用机器学习的库,之前只会一些Flask的基本操作。
这是一个基于xyolo库搭建的Web图片目标识别项目,(属于没事儿写着玩地那种),前端使用了纯原生开发(去年写这个东西的时候还不会Vue),后端API部分使用的flask,代码极为简单。
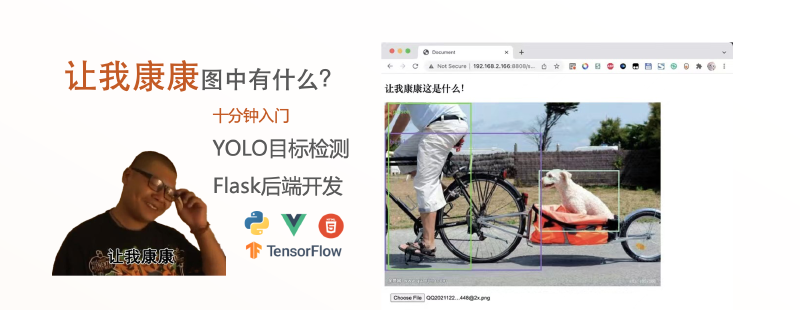
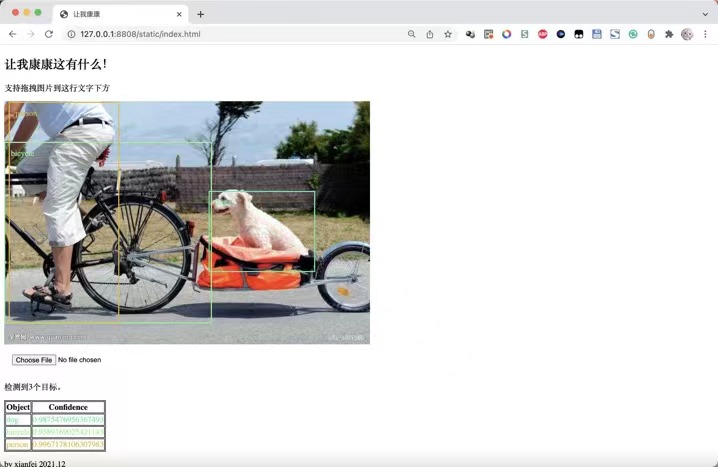
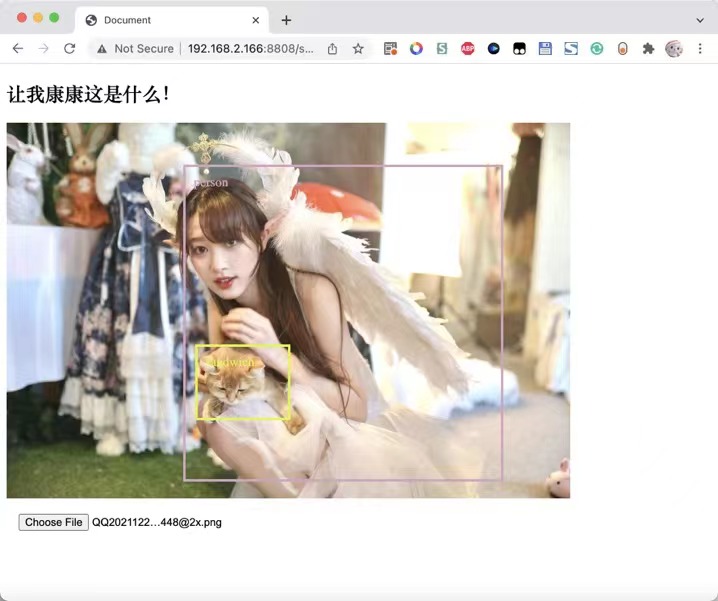
预览
这里有几张图片,方便大家看一下这个东西最后是个什么效果,图中不同颜色的框框是由前端div绘制,并且识别结果tag也是由html绘制的。在最后还绘制了一个用于显示识别结果和准确率的表格。

实现
后端代码
 1
 2
 3
 4
 5
 6
 7
 8
 9
10
11
12
13
14
15
16
17
18
19
20
21
22
23
24
| import numpy
from xyolo import YOLO, DefaultYolo3Config
from xyolo import init_yolo_v3
from flask import Flask, jsonify, request
from flask_cors import CORS
from PIL import Image
app = Flask(__name__)
CORS(app, resources=r'/*')
config = DefaultYolo3Config()
init_yolo_v3(config)
yolo = YOLO(config)
@app.route('/postimg', methods=['POST'])
def hello_world():
img = Image.open(request.files['file'].stream)
result = yolo.detect_image(img)
print(result)
return jsonify({'result':numpy.array(result).tolist()})
if __name__ == '__main__':
app.run(host='0.0.0.0', port=8808, debug=True)
|
前端代码
此处偷懒了,都写到html里面了
  1
  2
  3
  4
  5
  6
  7
  8
  9
 10
 11
 12
 13
 14
 15
 16
 17
 18
 19
 20
 21
 22
 23
 24
 25
 26
 27
 28
 29
 30
 31
 32
 33
 34
 35
 36
 37
 38
 39
 40
 41
 42
 43
 44
 45
 46
 47
 48
 49
 50
 51
 52
 53
 54
 55
 56
 57
 58
 59
 60
 61
 62
 63
 64
 65
 66
 67
 68
 69
 70
 71
 72
 73
 74
 75
 76
 77
 78
 79
 80
 81
 82
 83
 84
 85
 86
 87
 88
 89
 90
 91
 92
 93
 94
 95
 96
 97
 98
 99
100
101
102
103
104
105
106
107
108
109
110
111
112
113
114
115
116
117
118
119
120
121
122
123
124
125
126
127
128
129
130
| <!DOCTYPE html>
<html lang="en">
<head>
<meta charset="UTF-8">
<meta http-equiv="X-UA-Compatible" content="IE=edge">
<meta name="viewport" content="width=device-width, initial-scale=1.0">
<title>让我康康</title>
<script type="text/javascript" src="https://cdn.jsdelivr.net/npm/jquery@3.2.1/dist/jquery.min.js"></script>
<style>
input {
margin: 15px;
}
.myimg {
max-height: 100vh;
max-width: 100%;
margin: auto;
}
.target-info {
color: #f00;
padding: 10px;
border: solid 3px #f00;
}
table,
th,
td {
border: 1px solid black;
}
</style>
</head>
<body>
<h2>让我康康这有什么!</h2>
<p>支持拖拽图片到这行文字下方</p>
<div id="dropBox" style="min-height: 100px; min-height: 100px;">
<div id="target" style="position:absolute"></div>
<img src="" id="myimg" class="myimg">
</div>
<input id="fileInput" type="file" onchange="processFiles(this.files)">
<img id="thumbnail">
<p id="stat">就绪</p>
<table id="restab">
<tr><th>Object</th><th>Confidence</th></tr>
</table>
<p>by xianfei 2021.12</p>
<script>
var dropBox;
window.onload = function () {
dropBox = document.getElementById("dropBox");
dropBox.ondragenter = ignoreDrag;
dropBox.ondragover = ignoreDrag;
dropBox.ondrop = drop;
}
function ignoreDrag(e) {
//因为我们在处理拖放,所以应该确保没有其他元素会取得这个事件
e.stopPropagation();
e.preventDefault();
}
function drop(e) {
//取消事件传播及默认行为
e.stopPropagation();
e.preventDefault();
//取得拖进来的文件
var data = e.dataTransfer;
var files = data.files;
//将其传给真正的处理文件的函数
processFiles(files);
}
function ran() {
return Math.floor(Math.random() * 256);
}
function processFiles(files) {
$('#stat').html('正在上传及处理中……')
var file = files[0];
const formData = new FormData();
formData.append('file', file)
fetch("/postimg", {
body: formData,
method: "post"
}).then(res => {
res.json().then(json => {
$('#stat').html('检测到'+json.result.length+'个目标。')
var e = $('#myimg')
var heightRate = e.height() / e[0].naturalHeight
var widthRate = e.width() / e[0].naturalWidth
if (json.result.length == 0) $('#target').append('<div style="position:absolute;width:100px;">检测失败</div>')
for (var i of json.result) {
var color = 'rgb(' + ran() + ',' + ran() + ',' + ran() + ')';
$('#restab').append('<tr style="color:' + color + ';"><td>'+i[0]+'</td><td>'+i[2]+'</td></tr>')
$('#target').append('<div style="position:absolute;margin-left:' + i[3] * widthRate + 'px;margin-top:' + i[4] * heightRate + 'px;width: ' + (i[5] - i[3]) * widthRate + 'px;height: ' + (i[6] - i[4]) * heightRate + 'px;border-color: ' + color + ';color:' + color + ';" class="target-info">' + i[0] + '</div>')
}
console.log(json)
})
}).catch(ex => {
consoleLog("提交失败:" + ex.toString());
});
var output = document.getElementById("fileOutput");
//创建FileReader
var reader = new FileReader();
//告诉它在准备好数据之后做什么
reader.onload = function (e) {
//使用图像URL来绘制dropBox的背景
$('#myimg')[0].src = e.target.result;
$('#target').html('')
$('#restab').html('<tr><th>Object</th><th>Confidence</th></tr>')
};
//读取图片
reader.readAsDataURL(file);
}
function showFileInput() {
var fileInput = document.getElementById("fileInput");
fileInput.click();
}
</script>
</body>
</html>
|